はじめに
福岡のホームページ制作・SEO対策の株式会社スゴヨクです。
WordPressカスタム投稿の管理画面から動画と画像を表示したい時はありませんか。
今回は、swiperスライダーのサムネイルとメインスライドが連動型のスライダーにて動画と画像双方を表示させる方法を紹介します。
※動画は繰り返しフィールド、画像は各画像のフィールド(繰り返しフィールドではない)を用いています。
どんな動画を埋め込む?
まず、動画と言っても、様々なファイル形式があります。
ここでは一般的に使われているファイル形式「MP4」の動画や画像をWordPressのカスタム投稿(繰り返し投稿)にて埋め込み表示する方法を解説します。
※WordPressの記事内で埋め込み表示できるファイル形式はMP4です。そのため、MP4はそのままの状態でも埋め込みできるのですが、MP4以外の動画ファイルはMP4への変換が必要です。
MP4とは
MP4(エムピーフォー)とは、非常に一般的な動画フォーマット 形式。拡張子は.mp4。 YouTubeやVimeoなどの大手動画共有サイトでは、ほとんどの動画がMP4形式でアップロードされています 。
手順
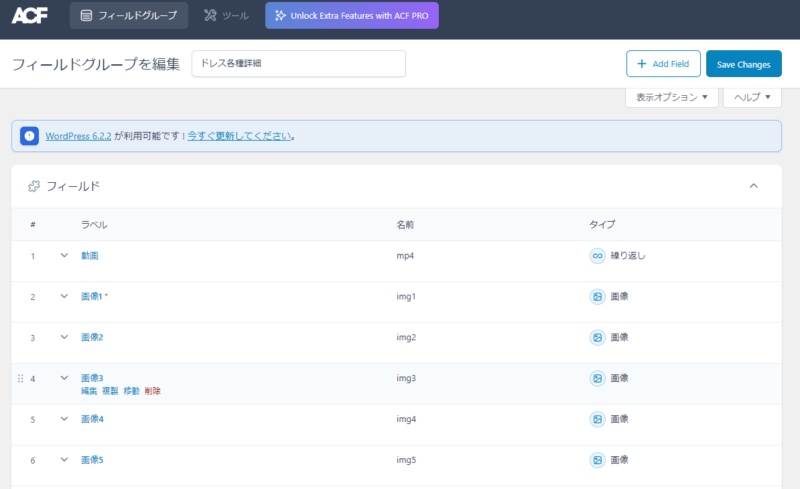
1. wordpressのカスタムフィールドで繰り返し投稿を作成する
WordPressのCustom Fieldsメニューにて、メニュー→カスタムフィールド→フィールドグループ→「新規追加」を押します。
フィールドを追加し、繰り返しフィールドを追加していきます。
今回は、フィールドタイプを
動画→「繰り返しフィール(mp4))」>サブフィールドのフィールドタイプは「ファイル(mp401)」
画像→5つの「画像(img~)フィールドにしています
2. カスタム投稿の画面にてファイルをアップロードする
カスタム投稿の画面にて、動画や画像をアップロードします。
3. カスタムフィールドのmp4動画と画像を出力させる
Singleページのphpにて以下の記述をし、管理画面にて入力した繰り返しフィールドのmp4動画を出力させます。
- <div class=“swiper swiperMain”>
- <div class=“swiper-wrapper”>
- <!– ループ開始 –>
- <?php if (have_posts()): ?>
- <?php while (have_posts()) : the_post(); ?>
- <!– 繰り返しフィールドを表示 –>
- <?php if( have_rows( ‘mp4’ ) ): ?>
- <?php while( have_rows( ‘mp4’ ) ): the_row(); ?>
- <?php
- $url = get_sub_field( ‘mp401’ );
- ?>
- <div class=“swiper-slide”>
- <video src=“<?php echo $url ?>” autoplay playsinline muted loop></video>
- </div>
- <?php endwhile; ?>
- <?php endif; ?>
- <!– 画像フィールドを表示 –>
- <?php if( get_field(‘img1’) ) { ?>
- <div class=“swiper-slide”>
- <span style=“background-image: url(<?php the_field(‘img1’); ?>)”></span>
- </div>
- <?php } ?>
- <?php if( get_field(‘img2’) ) { ?>
- <div class=“swiper-slide”>
- <span style=“background-image: url(<?php the_field(‘img2’); ?>)”></span>
- </div>
- <?php } ?>
- <?php if( get_field(‘img3’) ) { ?>
- <div class=“swiper-slide”>
- <span style=“background-image: url(<?php the_field(‘img3’); ?>)”></span>
- </div>
- <?php } ?>
- <?php if( get_field(‘img4’) ) { ?>
- <div class=“swiper-slide”>
- <span style=“background-image: url(<?php the_field(‘img4’); ?>)”></span>
- </div>
- <?php } ?>
- <?php if( get_field(‘img5’) ) { ?>
- <div class=“swiper-slide”>
- <span style=“background-image: url(<?php the_field(‘img5’); ?>)”></span>
- </div>
- <?php } ?>
- <?php endwhile; ?>
- <?php endif; ?>
- </div>
- <!– ページネーションを追加するときは以下を追加 –>
- <div class=“swiper-pagination swiper-pagination-white”></div>
- <!– 追加ここまで –>
- </div>
- <div class=“swiper swiperThumbnail”>
- <div class=“swiper-wrapper”>
- <!– サムネイルのループ開始 –>
- <?php if (have_posts()): ?>
- <?php while (have_posts()) : the_post(); ?>
- <!– 繰り返しフィールドを表示 –>
- <?php if( have_rows( ‘mp4’ ) ): ?>
- <?php while( have_rows( ‘mp4’ ) ): the_row(); ?>
- <?php
- $url = get_sub_field( ‘mp401’ );
- ?>
- <div class=“swiper-slide”>
- <video src=“<?php echo $url ?>” autoplay muted loop></video>
- </div>
- <?php endwhile; ?>
- <?php endif; ?>
- <!– 画像フィールドを表示 –>
- <?php if( get_field(‘img1’) ) { ?>
- <div class=“swiper-slide”>
- <span style=“background-image: url(<?php the_field(‘img1’); ?>)”></span>
- </div>
- <?php } ?>
- <?php if( get_field(‘img2’) ) { ?>
- <div class=“swiper-slide”>
- <span style=“background-image: url(<?php the_field(‘img2’); ?>)”></span>
- </div>
- <?php } ?>
- <?php if( get_field(‘img3’) ) { ?>
- <div class=“swiper-slide”>
- <span style=“background-image: url(<?php the_field(‘img3’); ?>)”></span>
- </div>
- <?php } ?>
- <?php if( get_field(‘img4’) ) { ?>
- <div class=“swiper-slide”>
- <span style=“background-image: url(<?php the_field(‘img4’); ?>)”></span>
- </div>
- <?php } ?>
- <?php if( get_field(‘img5’) ) { ?>
- <div class=“swiper-slide”>
- <span style=“background-image: url(<?php the_field(‘img5’); ?>)”></span>
- </div>
- <?php } ?>
- <?php endwhile; ?>
- <?php endif; ?>
- </div>
- </div>
mp4動画の次に画像が表示されるようにしています。
swiperスライダーを使いたかったので、swiperMain と swiperThumbnailに分けて記述しています。
4. swiperスライダー本体を読み込む
swiper-bundle.min.cssとswiper-bundle.min.jsを設置します。
5. custom.jsを作成する
メインのSwiperにthumbsをサムネイルとして使用すると指定するだけでサムネイルとして認識してくれます。
- var swiperThumbnail = new Swiper(“.swiperThumbnail”, {
- slidesPerView: 5,
- spaceBetween: 8,
- freeMode: true,
- watchSlidesProgress: true,
- });
- var mySwiper = new Swiper (‘.swiperMain’, {
- effect: “fade”, // フェードさせる
- direction: ‘horizontal’,
- loop: false,
- // Navigation
- pagination: {
- el: ‘.swiper-pagination’,
- type: ‘bullets’,
- clickable: true,
- },
- thumbs: {
- swiper: swiperThumbnail,
- },
- on: {
- transitionStart: function(){
- var videos = document.querySelectorAll(‘video’);
- Array.prototype.forEach.call(videos, function(video){
- video.pause();
- });
- },
- transitionEnd: function(){
- var activeIndex = this.activeIndex;
- var activeSlide = document.getElementsByClassName(‘swiper-slide’)[activeIndex];
- var activeSlideVideo = activeSlide.getElementsByTagName(‘video’)[0];
- activeSlideVideo.play();
- },
- }
- })
以上でスライダーの作成は完了です。これまでの内容を実装すると、動画と画像の両方のswiperスライダーが完成します。
あとは、cssでスライダーの調整をすればOK!
おわりに
今回はカスタム投稿の個別ページでの、 swiperスライダーを用いた動画と画像の出力方法をご紹介しましたが、この実装方法を応用することで、個別ページだけではなく一覧ページでもアイキャッチ画像のように動画を表示させることが可能です。
今後も動画を扱う機会が増えると思うので、忘れないためのメモ。